Friday, July 20, 2012

Black Swan Costume

This costume was put on the back burner for such a long time.  But I felt I had to finish, if for no other reason, than to stash it in my etsy shop.  This is not an actuall tutu that a dancer would wear onstage--I created this as a costume, and wears quite like any little black dress (but you can still dance in it:).  It's two parts:  bodice and skirt.  They are both embellished with distressed tulle, coq feather trim, black and crystal gems, black trim, and more black tulle than I can keep up with.  The top layer of the skirt is black organza, and I put a sprinkling of gems on the left of the skirt like the film version.  I had to make this one long enough to cover my rear...but, I do have a 'pancake' style underskirt that can be worn underneath to raise the skirt and flatten it all out.
For the shoot I left my pink leather ballet slippers at home and opted for dressy combat boots.  This is a fun costume to make...any costume that involved feathers and gems is a sure winner!

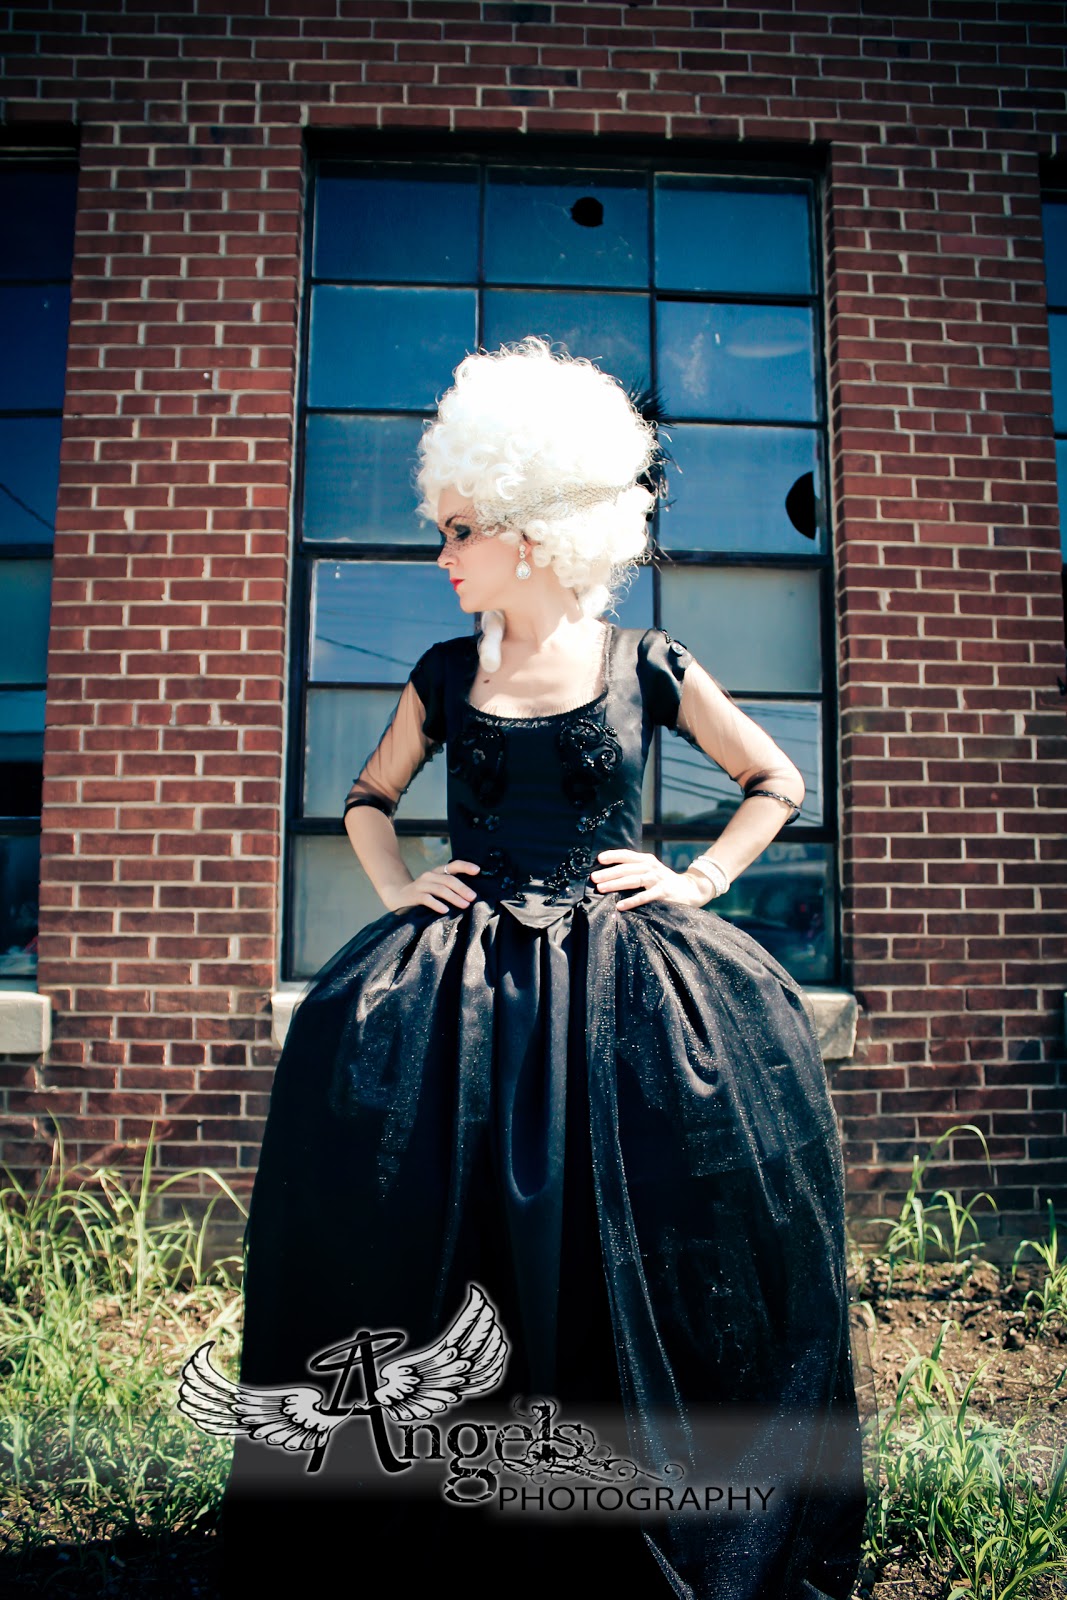
Marie Antoinette's Black Masquerade Gown

Another costume based on the fantastic 'Marie Antoinette!'  I want to make all of them, of course, but one at a time; one at a time.....
I really love the black shimmery ballgown she wears to the Parisian Masked Ball.  It's so different---aside from her mourning gowns, it's the only time we see her in a dark color.  Plus, you gotta love a black dress;)  So I used my trusty Simplicity pattern, made the neccessary modifications, and concocted my version of the gown.  I had to be creative with the beaded embellishment on the bodice.  Luckily, I have a vintage silk beaded blouse that I wanted to use for parts, and the heavy beadwork was ripe for picking.  I cut symmetrical sections of the beadwork out and hand-stitiched them to the stomacher and sleeve caps.  The sleeves themselves are made of tulle, which make the dress sooooo much more comfy to move in (the tight curve of the 'normal' sleeve can be a little constrictive), and are trimmed out with some pretty sequined scalloped trim.  There is a black sparkle tulle overlay to the skirt as well.  I cannot wait to wear this one out!  Not too sure about the wig, though.  It really needs some work...looks like a giant cotton ball on my head.  I ended up just pulling it off my head during the shoot!

Lady Gaga: Just Dance Dress

I was stewing on a few Lady Gaga costumes some time ago; I wanted to make one that was wearable and that I could possibly commission, not necessarily for myself.  Since I don't really keep up with her video wardrobe (I have seen some of the highly publicized red carpet costumes), this one nearly slipped by me!  But I came across it online and thought it would be a fun costume to try.
So....I watched the video, then drafted myself a pattern.  It looks like a pretty simple but very cute batwing dress in a pseudo-zebra style print.  The collar is made with what looks like a black and white leopard print.  I actually found two fabrics that will work.  One (the one in the photos) looks more 'zebra' than the other.  As for the black/white leopard print...after some searcing, I found a similar fabric.  The collar stands pretty well in the video, so I added an extra layer to it and reinforced it with interfacing. 
It's actually very wearable--you can adjust the length by a few inches and move freely in it, which is more than I can say for a lot of costumes I've worn:).  I'll hopefully be putting this one in my etsy shop very soon!

Sunday, January 29, 2012

Black Swan Tiara

I've had my own Black Swan costume on the back burner for several months now, and while I am working on a version to sell in my etsy shop, I thought that it would be a good idea to tinker with the tiara and bun topper.  After playing around with different types of clay, I finally found one that I was comfortable with.  So then I just did a couple of trial-and-error runs, shaping wire bases to see which one I like the best, then forming the clay over the bases (I am no clay expert, but it is fun!). 
After it dries, I filled in any problem areas with more clay and let it dry.  When it started to look the way I wanted, I was finally able to paint it, first with metallic pewter spray, then highlights by hand with acrylic in black, silver and graphite.  It's hard to see the highlights in the pictures.
My favorite part...the rhinestones!  I found some vintage Czech glass rhinestones on ebay, the only problem was, it's virtually impossible to find settings to fit them.  Oh, well, I was still able to attach them to the tiara no problems.
The posting:  http://www.etsy.com/listing/91765039/black-swan-tiaramade-to-order

Monday, January 16, 2012

The Hunger Games: Glimmer's Parade Costume

One of my New Year's resolutions (one of the ones I do intende to keep) was to make some costumes to offer up in my etsy shop and/or take on a few commissions this year.  So I got to work over Christmas break.  And as the toddler-doodle slept at night and during naps, I read the Hunger Games trilogy and sewed.  Then I combined the two.  As I read the first book, I actually tabbed pages that described clothes and costumes that sounded interesting to make.  There were several....then there was the 'Mockingjay' dress later on....maybe I'll do that one later....
Anyway, there is a brief description of the District 1 Tribute costumes for the Opening Ceremony parade..."tasteful tunics glittering with jewels" (Collins).  So I just went with that.  I made a simple A-line dress with silver satin, then lined it in white muslin (although the pattern didn't call for lining, it seemed like a good idea).  After I sewed in the zipper and the hook and eye, I started pairing off the gems.  I wanted the design across the chest to be symmetrical, then the smaller gems that sprinkle toward the bottom can be sprinkled across at random.  There are hundreds....placed one at a time with gem-tac.  Hot glue won't hold, and e-6000 eats away at the foil on the back of the gems.  The gem tac holds them quite well.  So, yeah, the process of be-jewelling the dress took many, many hours-the back is adorned as well.  But so much fun.
I couldn't make this one without one glittery accessory, since District 1 does make luxury items.  So I used some leftover satin to cover a fascinator base, made some puffy ruffles, and jewelled the front.  I also cut out a "1" and glittered it then placed some leftover Swarovski crystals (from another project) then set it in the middle of the ruffles.  It needed that extra something to identify it, and the number seemed like the reight thing to do--it's small and subtle, and a Hunger Games fan will know exactly what it means.  Top it off with a white ostrich plume and voila!
I also have another Hunger Games costume in the works, and will post pics here as soon as it is done!
Check out my dress here and on my etsy site:  http://www.etsy.com/shop/arabydesigns?ref=ss_profile


Saturday, December 31, 2011

Happy New Year!

Here's a Happy New Year for all my fellow costumers and costume lovers!

Sunday, December 4, 2011

Ever After: Danielle's 'Breathe' Gown

Ok, as far as labor and materials go, this has been my most intense costume to date.  There was so much research behind it, and I must have watched the Masqued Ball scene of  Ever After about 100 times.  I will probably edit and re-edit this post, but I thought I'd at least get it started.
I've loved this gown for a long time, and like many of my costumes, I simply have to work up the nerve to get it started.  Up until now, it seemed way out of my league.  There is soooo much detail to consider, plus the fact that you're working with a lot of delicate materials.  Then, there are those wings. Here is the basic run-down of how I created this costume.  I hope someone finds it useful!

The Pattern:  Simplicity #8735.  It is out of print now, but you may be able to find it on ebay.  This pattern served primarily as a base for the bodice.  The rest was heavily modified.  I didn't even use the sleeve pattern. 

The Fabrics:  For the underskirt and underlayer of the bodice, I went with the good old casa satin in white from Joanne fabrics.  Like the rest of the fabric, I dyed this satin in pearl gray (very lightly) then gave it a tea bath.  For the overskirt, I was actually able to find a gorgeous metallic crinkle silk in silver at GoldenSilks.com.  It looks very much like the fabric in the film!  For the alternating panels, I found some regular white chiffon that I dyed as I did my satin.  Not totally accurate, but I could not find the appropriate silk for those panels, and even if I did, I probably would have blown my budget.  I used dyed chantilly lace on the bodice, as it had the scallopped edge I needed.


The Trimmings:  This is where it gets interesting.  In the film version, there is a beautiful floral bullion trim edging out the overskirt and it is also found on the bodice.  Try as I did, I could not find bullion trim that even came close.  I assume that trim may have been made specifically for that gown and is not offered up to the masses.  I found some florall bridal trim that sufficed (after trying about 4 or 5 other trim samples), but it was wayyy to wide, so I trimmed it up, dyed it, then beaded it with some seed beads.  You'll find a variety of trims and laces on the bodice and sleeves as well, including metallic silver and gold ribbon, pearl trim, floral lace trim, and a beatiful lotus-shaped applique.  I found an applique on ebay that's pretty close, then I made the beaded appliques that span outward from it. 


Detail Work:  I'd say I spent about 4 months on the skirt embellishment...the chiffon panels were embroidered by machine--it took FOREVER.  I did it in sections--first, I'd cut a sheet of iron-on stabilizer and iron it to the chiffon.  Second, I drew the pattern to be embroidered onto the stabilizer.  Third, I used the tiniest of zig-zag stitches in silver metallic thread to embroider the pattern.  It was a slow, grueling process that took about 1.5 hours per section.  There were 5-7 sections per panel (the panels in back are longer).  After a panel was complete, I'd sew on the little pearls.  I used the tiny plastic pearls you buy by the bagful at Joanne's.  I ended up having to buy a second bag.  Honestly, I lost count of how many pearls had to be sewn on by hand (close to 2000?).  I reallylike the way it turned out, though.  When fabric can't be bought, sometimes you make it yourself!

The Sleeves:  The sleeves were made by layering sections of silk, tulle, more silk, more tulle.  The crinkle silk is at the top (connected to the bodice).  I was able to modify some lace to create the 'arched' look in the movie lace...the laces and trims were layerd down the arm.  It's hard to describe, so I'll let the pics do most of the talking for now.  Needless to say, the sleeves were made entirely by hand...everything was way to delicate, or there was the hand beading to consider...so definitely no machines!  The final section was made with 4 layers of tulle, edged out at the wrist with delicate bridal lace and the remainder of the pearl trim.  I cut flower shapes from the leftover chantilly lace and appliqued them to the tulle.  Rhinestones were arranged at the wrist...you can see them on the film version!


The Shoes:  I shopped around for some shoes that were similar to the ones worn in the film and found some beautiful Indian bridals, but I had a budget to consider.  Luckily, I found a pair of clear Sam and Libby heels at a friend's garage sale for 50 cents.  There was only the clear band across the top of the foot and a really nice lucite heel whose shape is close to that of the film shoe.  So I set out the create the uppers with layers of duck canvas and satin.  I beaded the uppers and attached them to the shoe with E-6000 glue.  Lots of it.  I trimmed out the ugly edges with a tiny silver metallic rope trim which looked close to the screen worn version.  For the heel, I attached 2 filgrees and several Swarovski rhinestones.  They aren't 100% accurate, but they are pretty comfy and very sparkly!


The Wings: I started by drawing a template onto paper, then using some all-purpose wire I bought at Lowe's, cut and bent the wire into shape (not easily done...sore fingers!).  Copper tape held the pieces together until they were spot-welded together.  After welding, they were sprayed with silver chrome paint, and the outer edge painted gold.  I used light silver tulle to fill it all in...sewn to the wire with metallic silver thread.  That was a total exercise in patience.  When transporting them, I had to be very careful...the netting would rip or the thread would snap if you just looked at it funny. 
I wanted them to look close to the film version, so I made an undercorset to act as a sort of harness to keep the wings steady.  It was a basic corset pattern, but heavily boned in the back around channels that had been sewn in...the wing attachments would slide down into the channels...they stayed pretty well and weren't a huge pain!


Pictures:


I've only worn this gown one time-for the DragonCon Costume Contest.  I received lots of nice feedback on its construction and detail, which was great.  Brian was so sweet to act as my 'wingman,' carrying my wings to and fro and making sure they were secure.  Hopefully, I'll be able to wear it again, even though it is tough walking in any crowded areas with those wings!
I could not have made this dress without the awesome reference pics on Maggie's site EverAfterCostumes.com.  Many thanks!!